When it comes to eyebrows, it’s very similar to fashion: it changes with what’s in and what’s out. At one point, we all aimed to have the thin pencil-lined, rainbow-shaped brow; today, BIG, BOLD, and natural is what’s in. Beauty companies are creating stiffer pencils, creams, gels, and powders to capitalize on this latest trend. And while a lot of women will go to a nail salon to have their brows shaped by someone who specializes in nails, it’s best to allow a “brow specialist” to care for your brows. This specialist will pay close attention to understanding your face and bone structure. More and more, “brow bars” are opening, offering brow services using wax, thread, or tweezing methods. I’ve seen prices ranging from $25 to $125. Don’t worry, Face2Face Africa has five tips to get your brows looking their very best for less.
SEE ALSO: Want To Keep Your Complexion Clear? Exfoliate!
Some women get a little obsessive about their eyebrows — and rightfully so! Eyebrows frame the face and highlight your eyes. In fact, manicured brows can make a person look younger and healthier and often eliminate the need for other makeup. Today, we will show you how to Do It Yourself (DIY)….


What You’ll Need:
- Mirror (with great light)
- Tweezer (with a flat, angled edge)
- Eyebrow scissor
- Eyebrow brush or toothbrush
- Eyebrow pencil
- Brow powder
- Clear gel mascara or wax
Step One
Choosing the right mirror is important. Never use a magnified mirror, because it will cause you to overpluck. Also stand far enough away from the mirror so that you can check to see if the eyebrows are balanced and if they match.
Step Two
Wash your face and splash warm water on the eyebrows so the hair becomes softer. Next, use an eyebrow brush (looks identical to a mascara wand) or a toothbrush dedicated to your brows and brush up toward your temple. Once you’ve brushed upward, use the brow scissors to snip just the very ends of any long hairs. Keep in mind, regular scissors just won’t cut it, so be sure to use a version meant for brow grooming.
Now take an ice cube and glide it across your brows to numb the area and decrease the pain or sensitivity before the next step.
Step Three
Always start at your arch as your beginning spot (as shown in the picture below). Make sure to pull the 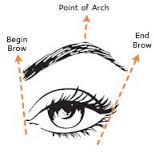 hair in the direction that it grows in; if you pull against how it grows, it causes the hair to break and leaves difficult-to-grasp stubs.
Tweeze from underneath — never on top — you don’t want to distort your natural line. The only exception to tweezing on top is if you have a few hairs that are out of place once you’ve found your arch or desired shape.
Step Four
Once you’ve plucked the hairs one by one and have the shape you desire, you may notice that you have a few sparse hairs, but do not fret! Use a brow powder or an eyebrow pencil (usually more matte and moisture resistant and easy to blend with your natural brow), and lightly stroke the areas. This helps to fill in those sparse hairs.
Step Five
Now that you have the desired look, use clear gel mascara or a wax to set the look. This keeps your brows in place for a long period of time, especially for those that have natural curly or coarse hair.
My clients always love their “after looks”!
By having groomed eyebrows, after you wake up in the morning and clean up your face, you still have a fresh face. For beginners, there are several brow kits on the market that include stencils and everything you need to achieve your desired look. Just like with any new challenge, make sure you have patience, and remember, practice makes perfect!
Who’s ready to BROWS with me?!.
Send your beauty questions to rj@renardajoynyc.com.
SEE ALSO: Makeup Tips: Cheek It Up with Blush